Showing posts with label Z4_Angular. Show all posts

Tuesday, March 10, 2020

JSON Server

Get a full fake REST API with zero coding in less than 30 sec

Install JSON Server :
npm install -g json-server

Create a db.json file with some data :
{
  "posts": [
    { "id": 1, "title": "json-server", "author": "typicode" }
  ],
  "comments": [
    { "id": 1, "body": "some comment", "postId": 1 }
  ],
  "profile": { "name": "typicode" }
}

Start JSON Server :
json-server --watch db.json
Now if you go to http://localhost:3000/posts/1,
you'll get
{ "id": 1, "title": "json-server", "author": "typicode" }

FillText.com

Introduction

FillText generates JSON datasets for testing or demonstration purposes.

Demos:

http://filltext.com/?rows=20&fname={firstName}&lname={lastName}
fname,lname,telephone,address,city,state,zip
id,email,username,password

Thursday, March 5, 2020

Visual Studio Code extensions for Angular developers


Working with TypeScript in general
1. TSLint
ext install tslint

2. Auto Import
ext install autoimport
Angular Code Generation
3. Angular 2 TypeScript Snippets
ext install Angular2

4. Angular 2 TypeScript/HTML Snippets
ext install angular2-snippets

5. Angular2 Files
ext install vscode-angular2-files

Other

6. angular2-inline
7. angular2-switcher
8. CSS Peek
ext install angular2-switcher

Bonus !
8. NgBootstrap Snippets
ext install ng-bootstrap-snippets

https://www.cognizantsoftvision.com/blog/visual-studio-code-extensions-angular-web-development-and-not-only/

Wednesday, March 4, 2020

Angular CLI cheatsheet

npm install -g @angular/cli
To create new application we need to type the command:
ng new 
One we have project ready, go to the project directory and serve the application:
cd 
ng serve -o
This will serve the application on 4200 port. That's it.

Angular CLI Cheat Sheet

ng new   # To create a new project

ng serve  # To host the project on 4200 port

ng serve --port no
> --host # To host application specific host/portWe can use a short alias as well:
ng s --p <port no> --h <hostname>

Some other helpful commands

ng lint # To lint and look for JavaScript errors

ng lint --format stylish # Linting and formatting the output

ng lint --fix # Lint and attempt to fix all the problems

ng build # to build a project in the dist folder

ng build ---target  # Target for which we want to build

ng build --prod # To build in production mode

ng test # To run spec files

ng e2e # To run e2e test cases

ng doc # To look for angular documentation

ng help # To get help on angular cli commands

To change the .angular-cli.json config

ng set # to change properties

# For e.g. ng set default.styleExt scss
# ng set default.styleExt scss -g -- To set in global angular-cli file

Components

ng generate component  # To generate new component
ng g c  # Short notation to generate component

ng g c  --flat # Want to generate folder name as well?

ng g c  --inline-template # Want to generate HTML file?
ng g c  -it # Short notation

ng g c  --inline-style # Want to generate css file?
ng g c  -is # Short notation

ng g c  --spec # Want to generate spec file?

ng g c  --view-encapsulation # View encapsulation stratergy
ng g c  -ve # Short notation

ng g c  --change-detection # Change detection strategy
ng g c  -cd # Short notation

ng g c  --dry-run # To only report files and don't write them
ng g c  -d # Short notation


ng g c  -m  -d 
# Name of module where we need to add component as dependency

Directives and services

ng generate directive  # To generate directive
ng g d  # short notation

ng g d  -d # To only report files and don't write them

ng generate service  # To generate service
ng g s  # short notation

ng g s  -d # To only report files and don't write them

ng g s  -m  
# Name of module where we need to add service as dependency

Classes, Interface, pipe, and enums

ng generate class  # To generate class
ng g cl  # short notation

ng generate interface  # To generate interface
ng g i  # short notation

ng generate pipe  # To generate pipe
ng g p  # short notation

ng generate enum  # To generate enum
ng g e  # short notation

Module and routing

ng generate module  # To generate module
ng g m  # To short notation

ng g m  --spec true -d # To generate spec file for the module

ng g m  --routing # To generate module with routing file

ng g guard  # To generate guard to route

Bonus Topic

Source Map Explorer

Source Map Explorer is a tool to view the treemap visualization to know where the code(from which file or module) is coming from. We can better understand it by using it.
To download the tool run the command as shown below:
npm install -g source-map-explorer
Now we have source map explorer installed globally.
To see the visualization firstly we need to build our angular app and then see the visualization. Please refer the command shown below:
ng build # To build the solution
source-map-explorer dist/main.bundle.js # Open a treemap visualization
 
angular cli cheat sheet 

Tuesday, March 3, 2020

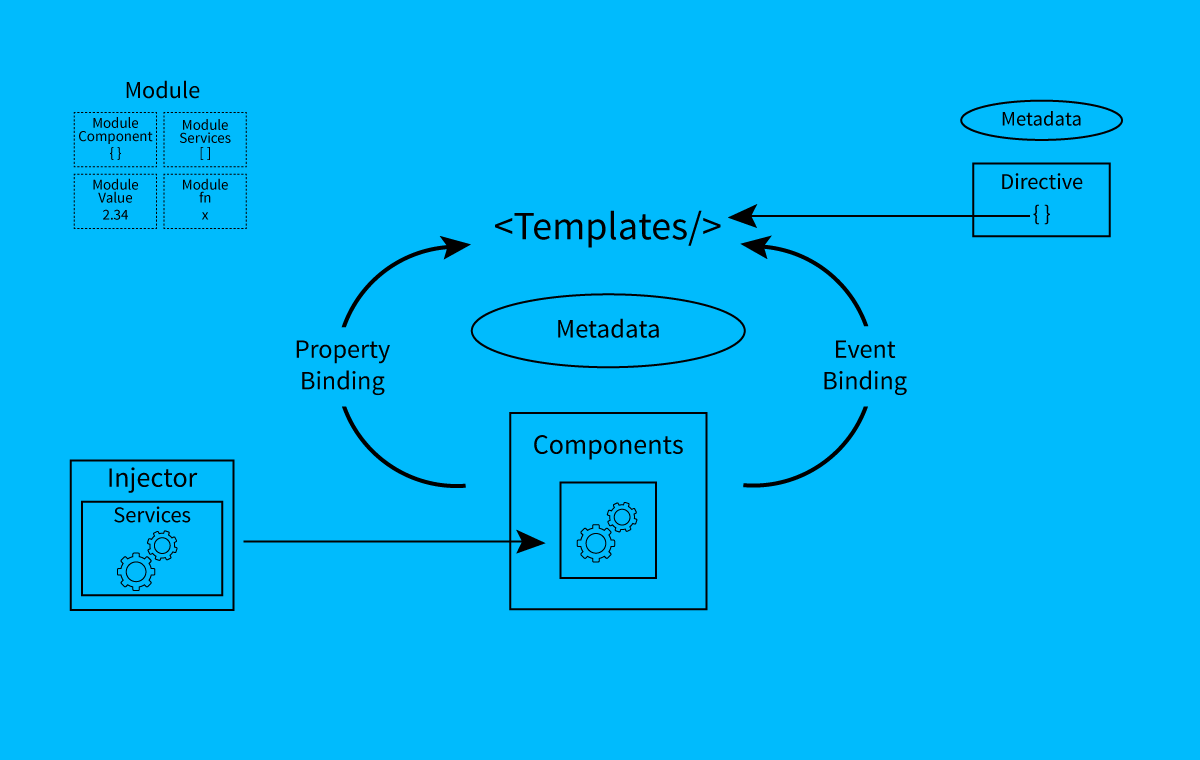
Angular Architecture Overview


There are basically 8 building blocks of Angular 2. These are:
  1.     Modules
  2.     Components
  3.     Templates
  4.     Metadata
  5.     Data binding
  6.     Directives
  7.     Services
  8.     Dependency Injection
Let's go over each one of them one by one.
Angular-2-Architecture1-1

Modules

Modules are blocks of code that do a certain type of task. A module exports some value in the main code, such as class. The first and the most common module that you will study is the one that exports Component Class.
app/app.component.ts (excerpt)
export class AppComponent { }

Here app.component is a module.

Libraries

Libraries' names start with the @angular prefix. Modules can be a library of other modules. Angular 2 itself has many modules that are libraries of others.
@angular/core is the most important library that contains most of the modules that we need.

Components

A component is basically a class that is used to show an element on the screen. The components have some properties and by using them we can manipulate how the element should look and behave on the screen. We can create a component, destroy, and update as the user moves in the application. Life Cycle hooks are the modules that we use for this purpose. Like ngOnInit()  
app/app.component.ts (excerpt)
export class blogComponent { }

Here blogComponent is a component.

Templates

The view of the component is defined through templates. Templates are basically the HTML we use to show on our page.
app/hero-list.component.html
   <h2>Hero List</h2>
   <p><i>Pick a hero from the list</i></p>
   <ul>
    <li *ngFor="let food of foods" (click)="selectedFood(food)">
      {{food.name}}
    </li>
   </ul>
<food-detail *ngIf="selectedFood" [food]="selectedHero"></food-detail>

This is a simple HTML file, but you may wonder: What are these elements?

*ngFor,{{food.name}}, (click), [food], and ?

Metadata

Metadata tells Angular how a class should be processed on the screen. For example:
@Component({
 selector: 'food-list',
 templateUrl: 'app/food-list.component.html',
 directives:  [FoodDetailComponent],
 providers:   [FoodService]
})

To tell Angular that we are using a component with certain metadata, we attach a decorator to it (“@”).
Here @Component will be identified as a component class.
Selector tells Angular to render the HTML that templateURL has at this tag
Directives are other components that this Component will require to render and providers are the services required.
The template, metadata, and component together describe a view.

Data Binding

The main feature of any JavaScript framework is data binding. As Angular 1, Angular 2 also support data binding.
There are 4 ways of binding a data according to the direction to the DOM, from the DOM, or in both directions:
<input [(ngModel)]="food.name">
<li>{{food.name}}</li>
<food-detail [food]="selectedFood"></food-detail>
<li (click)="selectFood(food)"></li>

  1. The {{hero.name}} interpolation display food.name value in li tag.
  2. The [hero] property binding passes the selected food value from parent to child component.
  3. The (click) event binding calls the selectedFood function when a user clicks on it.
  4. Two-way data binding is an important fourth way that combines property and event binding by the ngModel directive.

Directive

Directive helps us to add behavior to the DOM elements. We can attach multiple directives to the DOM elements. In TypeScript we define decoratives by @decorative decorator.
There are 3 types of decorative:
  1. Directive-with-a-template
  2. Structural
  3. Attribute
A component is a directive-with-a-template:
Structural directives add, delete and replace DOM elements. For example:
<li *ngFor = "let food of foods”>
<food-detail *ngIf="selectedFood"></food-detail>

Attribute directives
change the appearance of DOM elements. For example:
<input [(ngModel)]="hero.name">

Services

A service is a class containing any function, feature with a defined, and specific purpose. For example:
export class FoodService {
 getfoodies(): Food[] {
   return FOODIES;
 }
}

Dependency Injections

Dependency injection allows one to inject a dependency as a service throughout the web application. To inject a dependency we do not create a service but we have a constructor to request the service. The framework then provides it. For example:
constructor(private service: HeroService) { }

Saturday, November 23, 2019

ANGULAR 2 - ARCHITECTURE


Three Steps To Install Angular

Step 1 - Install NodeJS
  1. Follow the link - https://nodejs.org/en/download/
  2. Download the node.js installer for Windows and install it.
  3. Type the “npm -v” command to check the Node.js installation and version.
Angular

Step 2 - Install TypeScript
  1. Open the link https://www.npmjs.com/package/typescript
  2. Copy the above command “npm install -g typescript” and run it on command prompt.
Step 3 - Install Angular CLI
Open the link https://cli.angular.io/ and follow the instructions to install Angular CLI and to create your first  Angular app.
  1. Type the command “npm install -g @angular/cli” on the command prompt and press enter to install Angular cli.
  2. Type “ng new hello-world” and hit enter to create the Hello World app.
    Once you see the message “Project ‘hello-world’”  it means the app is created on the disk.
  3. Finally, the "Hello World" Angular app is created; now type “ng serve -o”.
Now, open the browser and type http://localhost:4200  in the address bar and hit enter to run the Hello World Angular app in the browser.

Angular