Friday, March 25, 2016

Apache FLUME


What is Flume?
Apache Flume is a tool/service/data ingestion mechanism for collecting aggregating and transporting large amounts of streaming data such as log files, events (etc...) from various sources to a centralized data store
Advantages of Flume
Here are the advantages of using Flume −
  • Using Apache Flume we can store the data in to any of the centralized stores (HBase, HDFS).
  • When the rate of incoming data exceeds the rate at which data can be written to the destination, Flume acts as a mediator between data producers and the centralized stores and provides a steady flow of data between them.
  • Flume provides the feature of contextual routing.
  • The transactions in Flume are channel-based where two transactions (one sender and one receiver) are maintained for each message. It guarantees reliable message delivery.
  • Flume is reliable, fault tolerant, scalable, manageable, and customizable.


Apache Flume - Architecture


  • Flume Event
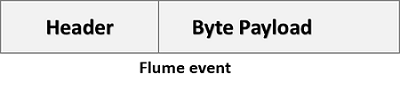
    An event is the basic unit of the data transported inside Flume. It contains a payload of byte array that is to be transported from the source to the destination accompanied by optional headers.
    A typical Flume event would have the following structure −
    Flume Event

    • Flume Agent
      An agent is an independent daemon process (JVM) in Flume. It receives the data (events) from clients or other agents and forwards it to its next destination (sink or agent). Flume may have more than one agent. Following diagram represents a Flume Agent
    Flume Agent
    A  Flume Agent contains three main components namely, source, channel, & sink.
    1. Source
      A source is the component of an agent which receives data from the data generators and transfers it to one or more channels in the form of Flume events.
      ExampleAvro source, Thrift source, Twitter 1% source etc.
    2. Channel
      A channel is a transient store which receives the events from the source and buffers them till they are consumed by sinks. It acts as a bridge between the sources and the sinks.
      Example
      JDBC channel, File system channel, Memory channel, etc.
    3. Sink
      A sink stores the data into centralized stores like HBase and HDFS. It consumes the data (events) from the channels and delivers it to the destination.
      Example
      HDFS sink
      Note
      :- A flume agent can have multiple sources, sinks and channels.

      Additional Components of Flume Agent

      A few more components that play a vital role in transferring the events from the data generator to the centralized stores.
    • Interceptors
      Interceptors are used to alter/inspect flume events which are transferred between source and channel.
    • Channel Selectors
      These are used to determine which channel is to be opted to transfer the data in case of multiple channels. There are two types of channel selectors −
      Default channel selectors
      − These are also known as replicating channel selectors they replicates all the events in each channel.
      Multiplexing channel selectors
      − These decides the channel to send an event based on the address in the header of that event.
    • Sink Processors
      These are used to invoke a particular sink from the selected group of sinks. These are used to create fail over paths for your sinks or load balance events across multiple sinks from a channel.

    Multi-hop Flow

    • Within Flume, there can be multiple agents and before reaching the final destination, an event may travel through more than one agent. This is known as multi-hop flow. 


    Fan-out Flow


    The data flow from one source to multiple channels is known as fan-out flow. It is of two types −
    • Replicating − The data flow where the data will be replicated in all the configured channels.
    • Multiplexing − The data flow where the data will be sent to a selected channel which is mentioned in the header of the event.


    Fan-in Flow

    • The data flow in which the data will be transferred from many sources to one channel is known as fan-in flow

    Flume example using netcat(source) and logger(sink):

    # START example.conf file : A single-node Flume configuration
    # Name the components on this AGENT
    a1.sources = r1
    a1.channels = c1
    a1.sinks = k1
    # Configure the SOURCE
    a1.sources.r1.type = netcat
    a1.sources.r1.bind = localhost
    a1.sources.r1.port = 44444
    # Use a CHANNEL which buffers events in memory
    a1.channels.c1.type = memory
    a1.channels.c1.capacity = 1000
    a1.channels.c1.transactionCapacity = 100
    # Configure the SINK
    a1.sinks.k1.type = logger
    # Bind the SOURCE and SINK to the CHANNEL
    a1.sources.r1.channels = c1
    a1.sinks.k1.channel = c1
    # END example.conf file

    ########## RUNNING FLUME AGENT ##########
    # flume-ng agent --conf conf --conf-file example.conf --name a1
    ######## RUNNING DATA GENERATOR #########
    # $ telnet localhost 44444
    # Hello World!

    Sunday, March 20, 2016

    Sqoop Vs Flume


      • Apache Sqoop and Apache Flume work with various kinds of data sources.
        Apache Flume functions well in streaming data sources which are generated continuously in hadoop environment such as log files from multiple servers whereas
        Apache Sqoop is designed to work well with any kind of relational database system that has JDBC connectivity. Sqoop can also import data from NoSQL databases like MongoDB or Cassandra and also allows direct data transfer or Hive or HDFS. For transferring data to Hive using Apache Sqoop tool, a table has to be created for which the schema is taken from the database itself.
      • In Apache Flume data loading is event driven whereas in
        Apache Sqoop data load is not driven by events.
      • Apache  Flume is a better choice when moving bulk streaming data from various sources like JMS or Spooling directory whereas
        Apache Sqoop is an ideal fit if the data is sitting in databases like Teradata, Oracle, MySQL Server, Postgres or any other JDBC compatible database then it is best to use Apache Sqoop.
        In Apache Flume, data flows to HDFS through multiple channels whereas in
        Apache Sqoop HDFS is the destination for importing data.
      • Apache Flume agents are designed to fetch streaming data like tweets from Twitter or log file from the web server whereas
        Apache Sqoop connectors are designed to work only with structured data sources and fetch data from them.
      • Apache Flume has agent based architecture i.e. the code written in flume is known as agent which is responsible for fetching data whereas in
        Apache Sqoop the architecture is based on connectors. The connectors in Sqoop know how to connect with the various data sources and fetch data accordingly.
      • Apache Sqoop is mainly used for parallel data transfers, for data imports as it copies data quickly whereas
        Apache Flume is used for collecting and aggregating data because of its distributed, reliable nature and highly available backup routes.

      Thursday, March 17, 2016

      APACHE HIVE

      What is Hive ?

      • Hive is SQL for Hadoop cluster.
      • It is an open source data warehouse system on top of HDFS that adds structure to the data.
      • It provides SQL like interface which is known as "Hive Query Language (HQL)".
      • We write the query in HQL which translate into Map-Reduce code and run the same on cluster.


      The main components of Hive are:
      • Metastore: It stores all the metadata of Hive. It stores data of data stored in database, tables, columns, etc..
      • Driver: It includes compiler, optimizer and executor used to break down the Hive query language statements.
      • Query compiler: It compiles HiveQL into DAG graph of map reduce tasks.
      • Execution engine: It executes the tasks produces by compiler.
      • Thrift server: It provides an interface to connect to other applications like MySQL, Oracle, Excel, etc. through JDBC/ODBC drivers.
      • Command line interface: It is also called Hive shell. It is used for working with data either interactively or batch data processing.
      • Web Interface: It is a visual structure on Hive used for interaction with data 
      • SerDe : Serializer, Deserializer gives instructions to hive on how to process a record.

      Data Storage in Hive:
      Hive has different forms of storage options and they include:
      • Metastore: Metastore keeps track of all the metadata of database, tables, columns, datatypes etc. in Hive. It also keeps track of HDFS mapping. The default Metastore is DerBy Database.
      • Tables: There can be 2 types of tables in Hive.
        First, normal tables (managed/internal tables) like any other table in database.
        Second, external tables (un-managed tables)  which are like normal tables except for the deletion part. HDFS mappings are used to create external tables which are pointers to table in HDFS.
        The difference between the two types of tables is that when the external table is deleted its data is not deleted. Its data is stored in the HDFS whereas in case of normal table the data also gets deleted on deleting the table.
      • Partitions: Partition is slicing of tables that are stored in different subdirectory within a table’s directory. It enhances query performance especially in case of select statements with “WHERE” clause.
      • Buckets: Buckets are hashed partitions and they speed up joins and sampling of data.
      Hive vs. RDBMS (Relational database)
      Hive and RDBMS are very similar but they have different applications and different schemas that they are based on.
      • RDBMS are built for OLTP (Online transaction processing) that is real time reads and writes in database. They also perform little part of OLAP. (online analytical processing).
      • Hive is built for OLAP that is real time reporting of data. Hive does not support inserting into an existing table or updating table data like RDBMS which is an important part of OLTP process.
        All data is either inserted in new table or overwritten in existing table.
      • RDBMS is based on write schema that means when data is entered in the table it is checked against the schema of table to ensure that it meets the requirements. Thus loading data in RDBMS is slower but reading is very fast.
      • Hive is based on read schema that means data is not checked when it is loaded so data loading is fast but reading is slower.

      Hive Query Language (HQL)
      HQL is very similar to traditional database. It stores data in tables, where each table consists of columns
      1. Data Definition statements (DDL) like create table, alter table, drop table are supported.
        All these DDL statements can be used on Database, tables, partitions, views, functions, Index, etc.
      2. Data Manipulation statements (DML) like load, insert, select and explain are supported.
        Load is used for taking data from HDFS and moving it into Hive.
        Insert is used for moving data from one Hive table to another.
        Select is used for querying data. Explain gives insights into structure of data.

      Hive Commands :

      Data Definition Language (DDL) :
      Example : CREATE, DROP, TRUNCATE, ALTER, SHOW, DESCRIBE Statements.
      Go to Hive shell by giving the command sudo hive and
      Enter the command ’create database to create the new database in the Hive.
      Create Hive database using Hive Commands
      To list out the databases in Hive warehouse, enter the command ‘show databases’.
      List Hive database using Hive Commands
      The database creates in a default location of the Hive warehouse.
      In Cloudera, Hive database store in a /user/hive/warehouse.
      The command to use the database is USE
      Hive command to use the database
      Copy the input data to HDFS from local by using the copy From Local command.

      Data Manipulation Language (DML) : Retrieving Information

      Function MySQL Hive
      Retrieving Information (General) SELECT from_columns FROM table WHERE conditions; SELECT from_columns FROM table WHERE conditions;
      Retrieving All Values SELECT * FROM table; SELECT * FROM table;
      Retrieving Some Values SELECT * FROM table WHERE rec_name = "value"; SELECT * FROM table WHERE rec_name = "value";
      Retrieving With Multiple Criteria SELECT * FROM TABLE WHERE rec1 = "value1" AND rec2 = "value2"; SELECT * FROM TABLE WHERE rec1 = "value1" AND rec2 = "value2";
      Retrieving Specific Columns SELECT column_name FROM table; SELECT column_name FROM table;
      Retrieving Unique Output SELECT DISTINCT column_name FROM table; SELECT DISTINCT column_name FROM table;
      Sorting SELECT col1, col2 FROM table ORDER BY col2; SELECT col1, col2 FROM table ORDER BY col2;
      Sorting Reverse SELECT col1, col2 FROM table ORDER BY col2 DESC; SELECT col1, col2 FROM table ORDER BY col2 DESC;
      Counting Rows SELECT COUNT(*) FROM table; SELECT COUNT(*) FROM table;
      Grouping With Counting SELECT owner, COUNT(*) FROM table GROUP BY owner; SELECT owner, COUNT(*) FROM table GROUP BY owner;
      Maximum Value SELECT MAX(col_name) AS label FROM table; SELECT MAX(col_name) AS label FROM table;
      Selecting from multiple tables (Join same table using alias w/”AS”) SELECT pet.name, comment FROM pet, event WHERE pet.name = event.name; SELECT pet.name, comment FROM pet JOIN event ON (pet.name = event.name)


      Using Metadata :

      Function MySQL Hive
      Selecting a database USE database; USE database;
      Listing databases SHOW DATABASES; SHOW DATABASES;
      Listing tables in a database SHOW TABLES; SHOW TABLES;
      Describing the format of a table DESCRIBE table; DESCRIBE (FORMATTED|EXTENDED) table;
      Creating a database CREATE DATABASE db_name; CREATE DATABASE db_name;
      Dropping a database DROP DATABASE db_name; DROP DATABASE db_name (CASCADE);

      Current SQL Compatibility


      Hive Command Line :

      Function Hive
      Run Query hive -e 'select a.col from tab1 a'
      Run Query Silent Mode hive -S -e 'select a.col from tab1 a'
      Set Hive Config Variables hive -e 'select a.col from tab1 a' -hiveconf hive.root.logger=DEBUG,console
      Use Initialization Script hive -i initialize.sql
      Run Non-Interactive Script hive -f script.sql

      The .hiverc file :
      What is .hiverc file?
      It is a file that is executed when you launch the hive shell - making it an ideal place for adding any hive configuration/customization you want set, on start of the hive shell. This could be:
      - Setting column headers to be visible in query results
      - Making the current database name part of the hive prompt
      - Adding any jars or files
      - Registering UDFs

      .hiverc file location
      The file is loaded from the hive conf directory.
      If the file does not exist, you can create it.
      It needs to be deployed to every node from where you might launch the Hive shell.

      Sample .hiverc
      add jar /home/airawat/hadoop-lib/hive-contrib-0.10.0-cdh4.2.0.jar;
      set hive.exec.mode.local.auto=true;
      set hive.cli.print.header=true;
      set hive.cli.print.current.db=true;
      set hive.auto.convert.join=true;
      set hive.mapjoin.smalltable.filesize=30000000;

      Sunday, March 13, 2016

      Apache PIG

      APACHE PIG


      • Apache Pig is a tool used to analyze large amounts of data by represeting them as data flows. 
      • Using the PigLatin scripting language operations like ETL (Extract, Transform and Load), adhoc data anlaysis and iterative processing can be easily achieved.
      • Pig is an abstraction over MapReduce. In other words, all Pig scripts internally are converted into Map and Reduce tasks to get the task done.


      Dataset : 

      The dataset is a simple text (movies_data.csv) file lists movie names and its details like
      release year, rating and runtime.
      To download : click here

      A sample of the dataset is as follows: 
      1,The Nightmare Before Christmas,1993,3.9,4568 
      2,The Mummy,1932,3.5,4388 
      3,Orphans of the Storm,1921,3.2,9062 
      4,The Object of Beauty,1991,2.8,6150 
      5,Night Tide,1963,2.8,5126 
      6,One Magic Christmas,1985,3.8,5333 
      7,Muriel's Wedding,1994,3.5,6323 
      8,Mother's Boys,1994,3.4,5733 
      9,Nosferatu: Original Version,1929,3.5,5651 
      10,Nick of Time,1995,3.4,5333
       
      Pig can be started in one of the following two modes:
      1. Local Mode  (In local mode, pig can access files on the local file system. )
      2. Cluster Mode (In cluster mode, pig can access files on HDFS.)
      Restart your terminal and execute the pig command as follows:
      To start in Local Mode:
      $ pig -x local
      To start in Cluster Mode:
      $ pig
      This command presents you with a grunt shell. The grunt shell allows you
      to execute PigLatin statements to quickly test out data flows on your 
      data step by step without having to execute complete scripts.
      Pig Latin Program :

      To LOAD the data :
      grunt> movies = LOAD 'movies_data.csv' USING PigStorage(',') as  id,name,year,rating,duration);
      Note: When this statement is executed, no MapReduce task is executed.
      grunt> DUMP movies;
      - It is only after the DUMP statement that a MapReduce job is initiated.
      - The DUMP command is only used to display information onto the standard output.

      List the movies that having a rating greater than 4 :
      grunt> movies_greater_than_four = FILTER movies BY (float)rating>4.0;
      grunt> DUMP movies_greater_than_four;

      To STORE the data to a file :
      grunt>store movies_greater_than_four into '/user/hduser/movies_greater_than_four';

      To include the data type of the columns :
      grunt> movies = LOAD 'movies_data.csv' USING PigStorage(',') as 
      (id:int,name:chararray,year:int,rating:double,duration:int);


      FILTER command :
      grunt> movies_greater_than_four = FILTER movies BY rating>4.0;

      List the movies that were released between 1950 and 1960 :
      grunt> movies_between_50_60 = FILTER movies by year>1950 and year<1960; 

      List the movies that start with the Alpahbet A :
      grunt> movies_starting_with_A = FILTER movies by name matches 'A.*';

      List the movies that have duration greater that 2 hours :
      grunt> movies_duration_2_hrs = FILTER movies by duration > 7200;

      List the movies that have rating between 3 and 4 :
      grunt> movies_rating_3_4 = FILTER movies BY rating>3.0 and rating<4.0;

      DESCRIBE Command :
      The schema of a relation/alias can be viewed using the DESCRIBE command:
      grunt> DESCRIBE movies;
      movies: {id: int,name: chararray,year: int,rating: double,duration: int}

      ILLUSTRATE Command : 
      To view the step-by-step execution of a sequence of statements you can use the ILLUSTRATE command:
      grunt> ILLUSTRATE movies_duration_2_hrs;

      Note: DESCRIBE & ILLUSTRATE are really useful for debugging.

      FOREACH : FOREACH gives a simple way to apply transformations based on columns.
      List the movie names its duration in minutes :
      grunt> movie_duration = FOREACH movies GENERATE name, (double)(duration/60);
      The above statement generates a new alias that has the list of movies and it duration in minutes.
      You can check the results using the DUMP command.

      GROUP : The GROUP keyword is used to group fields in a relation.
      List the years and the number of movies released each year.
      grunt> grouped_by_year = group movies by year; grunt> count_by_year = FOREACH grouped_by_year GENERATE group, COUNT(movies);

      Total number of movies in the dataset is 49590.
      To check  see if our GROUP operation is correct by verify the total of the COUNT field.

      grunt> group_all = GROUP count_by_year ALL;
      grunt> sum_all = FOREACH group_all GENERATE SUM(count_by_year.$1);
      grunt> DUMP sum_all;

      From the above three statements, the first statement, GROUP ALL, groups all the tuples to one group. This is very useful when we need to perform aggregation operations on the entire set.

      The next statement, performs a FOREACH on the grouped relation group_all and applies the SUM function to the field in position 1 (positions start from 0).
      Here field in position 1, are the counts of movies for each year.
      (49590)The above value matches to our know fact that the dataset has 49590 movies.
      So we can conclude that our GROUP operation worked successfully.

      ORDER BY : Let us question the data to illustrate the ORDER BY operation.
      List all the movies in the ascending order of year.
      grunt> desc_movies_by_year = ORDER movies BY year ASC;
      grunt> DUMP desc_movies_by_year; 

      List all the movies in the descending order of year :
      grunt> asc_movies_by_year = ORDER movies by year DESC;
      grunt> DUMP asc_movies_by_year; 

      DISTINCT : The DISTINCT statement is used to remove duplicated records.
      It works only on entire records, not on individual fields.
      grunt> movies_with_dups = LOAD 'movies_with_duplicates.csv' USING PigStorage(',') as (id:int,name:chararray,year:int,rating:double,duration:int);
      grunt> DUMP movies_with_dups;

      You see that there are are duplicates in this data set.

      List the distinct records present movies_with_dups :
      grunt> no_dups = DISTINCT movies_with_dups;
      grunt> DUMP no_dups;

      LIMIT : Use the LIMIT keyword to get only a limited number for results from relation.

      grunt> top_10_movies = LIMIT movies 10; 
      grunt> DUMP top_10_movies;

      SAMPLE : Use the sample keyword to get sample set from your data.

      grunt> sample_10_percent = sample movies 0.1;
      grunt> dump sample_10_percent;

      Here, 0.1 = 10%

      As we already know that the file has 49590 records.
      We can check to see the count of records in the relation.

      grunt> sample_group_all = GROUP sample_10_percent ALL;
      grunt> sample_count = FOREACH sample_group_all GENERATE COUNT(sample_10_percent.$0);
      grunt> dump sample_count;
      The output is (4937) which is approximately 10% for 49590. 

      Complex Types :
      Pig supports three different complex types to handle data. 
      Tuples : A tuple is just like a row in a table.
      (49539,'The Magic Crystal',2013,3.7,4561)
      The above tuple has five fields. A tuple is surrounded by brackets. 
      Bags : A bag is an unordered collection of tuples.
      { (49382, 'Final Offer'), (49385, 'Delete') }
      The above bag is has two tuples. Each tuple has two fields, Id and movie name. 
      Maps : A map is a store. The key and value are joined together using #.
      ['name'#'The Magic Crystal', 'year'#2013]

      Sunday, March 6, 2016

      ELK


      LOGSTASH :
      • An agent which normally runs on each server you wish to harvest logs from.
      • Its job is to read the logs (e.g. from the filesystem), normalise them (e.g. common timestamp format), optionally extract structured data from them (e.g. session IDs, resource paths, etc.) and finally push them into elasticsearch.
      ELASTICSEARCH
      • ElasticSearch is a search engine with focus on real-time and analysis of the data it holds.
      • It is document-oriented/based and you can store everything you want as JSON. This makes it powerful, simple and flexible.
      • It is build on top of Apache Lucene, and is on default running on port 9200 +1 per node.
      • PLUGIN :
        Note :- Install the following plugin by executing following command for GUI in ES.
        .\bin\plugin install mobz/elasticsearch-head
        .\bin\plugin install lukas-vlcek/bigdesk
        .\bin\plugin install royrusso/elasticsearch-HQ
        .\bin\plugin install lmenezes/elasticsearch-kopf
        Hit http://localhost:9200/_plugin/head/to see Elastic GUI.

        Hit http://localhost:9200/_plugin/bigdesk/ to see Elasticsearch Health.
        bigdesk1.png

      KIBANA :
      • A browser-based interface served up from a web server. 
      • It’s job is to allow you to build tabular and graphical visualizations of the log data based on elasticsearch queries. Typically these are based on simple text queries, time-ranges or even far more complex aggregations.
      • A server would get started and you could see the GUI at http://localhost:5601/
      SHIPPERS:
      Filebeat is for shipping log files to Logstash.
      Packetbeat is for analyzing your network data.
      Topbeat is for getting infrastructure information such as cpu and memory usage.
      Winlogbeat is for shipping windows event logs.

      Service manager:
      NSSM: https://nssm.cc/release/nssm-2.24.zip


      LOGSTASH CONF FILE:
      input {
           file {
               type => "apache-access"
               path => "D:/access.log"
           }
           file {
               type => "apache-error"
               path => "D:/error.log"
           }
       }
       output {
        # Emit events to stdout for easy debugging of what is going through
        # logstash.
        stdout { }

        # This elasticsearch output will try to autodiscover a near-by
        # elasticsearch cluster using multicast discovery.
        # If multicast doesn't work, you'll need to set a 'host' setting.
        elasticsearch { }
       }

      SAMPLE ERROR LOG FILE :
      [Fri Dec 16 01:46:23 2005] [error] [client 1.2.3.4] Directory index forbidden by rule: /home/test/
      [Fri Dec 16 01:54:34 2005] [error] [client 1.2.3.4] Directory index forbidden by rule: /apache/web-data/test2
      [Fri Dec 16 02:25:55 2005] [error] [client 1.2.3.4] Client sent malformed Host header
      [Mon Dec 19 23:02:01 2005] [error] [client 1.2.3.4] user test: authentication failure for "/~dcid/test1": Password Mismatch
      [Sat Aug 12 04:05:51 2006] [notice] Apache/1.3.11 (Unix) mod_perl/1.21 configured -- resuming normal operations
      [Thu Jun 22 14:20:55 2006] [notice] Digest: generating secret for digest authentication ...
      [Thu Jun 22 14:20:55 2006] [notice] Digest: done
      [Thu Jun 22 14:20:55 2006] [notice] Apache/2.0.46 (Red Hat) DAV/2 configured -- resuming normal operations
      [Sat Aug 12 04:05:49 2006] [notice] SIGHUP received.  Attempting to restart
      [Sat Aug 12 04:05:51 2006] [notice] suEXEC mechanism enabled (wrapper: /usr/local/apache/sbin/suexec)
      [Sat Jun 24 09:06:22 2006] [warn] pid file /opt/CA/BrightStorARCserve/httpd/logs/httpd.pid overwritten -- Unclean shutdown of previous Apache run?
      [Sat Jun 24 09:06:23 2006] [notice] Apache/2.0.46 (Red Hat) DAV/2 configured -- resuming normal operations
      [Sat Jun 24 09:06:22 2006] [notice] Digest: generating secret for digest authentication ...
      [Sat Jun 24 09:06:22 2006] [notice] Digest: done
      [Thu Jun 22 11:35:48 2006] [notice] caught SIGTERM, shutting down
      [Tue Mar 08 10:34:21 2005] [error] (11)Resource temporarily unavailable: fork: Unable to fork new process
      [Tue Mar 08 10:34:31 2005] [error] (11)Resource temporarily unavailable: fork: Unable to fork new process

      SAMPLE ACCESS LOG FILE :
      192.168.2.20 - - [28/Jul/2006:10:27:10 -0300] "GET /cgi-bin/try/ HTTP/1.0" 200 3395
      127.0.0.1 - - [28/Jul/2006:10:22:04 -0300] "GET / HTTP/1.0" 200 2216
      127.0.0.1 - - [28/Jul/2006:10:27:32 -0300] "GET /hidden/ HTTP/1.0" 404 7218
      x.x.x.90 - - [13/Sep/2006:07:01:53 -0700] "PROPFIND /svn/[xxxx]/Extranet/branches/SOW-101 HTTP/1.1" 401 587
      x.x.x.90 - - [13/Sep/2006:07:01:51 -0700] "PROPFIND /svn/[xxxx]/[xxxx]/trunk HTTP/1.1" 401 587
      x.x.x.90 - - [13/Sep/2006:07:00:53 -0700] "PROPFIND /svn/[xxxx]/[xxxx]/2.5 HTTP/1.1" 401 587
      x.x.x.90 - - [13/Sep/2006:07:00:53 -0700] "PROPFIND /svn/[xxxx]/Extranet/branches/SOW-101 HTTP/1.1" 401 587
      x.x.x.90 - - [13/Sep/2006:07:00:21 -0700] "PROPFIND /svn/[xxxx]/[xxxx]/trunk HTTP/1.1" 401 587
      x.x.x.90 - - [13/Sep/2006:06:59:53 -0700] "PROPFIND /svn/[xxxx]/[xxxx]/2.5 HTTP/1.1" 401 587
      x.x.x.90 - - [13/Sep/2006:06:59:50 -0700] "PROPFIND /svn/[xxxx]/[xxxx]/trunk HTTP/1.1" 401 587
      x.x.x.90 - - [13/Sep/2006:06:58:52 -0700] "PROPFIND /svn/[xxxx]/[xxxx]/trunk HTTP/1.1" 401 587
      x.x.x.90 - - [13/Sep/2006:06:58:52 -0700] "PROPFIND /svn/[xxxx]/Extranet/branches/SOW-101 HTTP/1.1" 401 587

      START ELASTICSEARCH:
      .\bin\elasticsearch.bat
      Checking Elasticsearch => http://localhost:9200/  =>> http://localhost:9200/_plugin/head/

      START LOGSTASH AGENT:
      .\bin\logstash agent -f logstash.conf

      START KIBANA:
      .\bin\kibana.bat 
      Checking Kibana=> http://localhost:5601

      NOTE: Copy & Paste log files (access & error log) in (D:\) directory.

      Wednesday, February 3, 2016

      Hadoop / HDFS Commands


      HDFS Command Syntax Overview:
      hadoop fs
      : Ex.: hadoop fs -ls
      hadoop version : check hadoop installed properly
      HELP:
      help [cmd]: hopefully this is self-describing


      Inspect files:
      -ls/lsr : list all files in (hadoop fs -ls /)
      -cat : print on stdout
      -tail [-f] : output the last part of the

      -test : return attributes of file and directory
      -touchz : create new emty file size 0
      -du/dus : show space utilization

      -count : no. of directories, files, and bytes
      -setrep : (-r) change the replication factor of file/directory
      -stat : info about the specified path

      Create/remove files:
      -mkdir : create a directory
      -mv : move (rename) files
      -cp : copy files
      -rm/rmr : remove files


      Copy/Put files from remote m/c into the HADOOP cluster:
      -copyFromLocal : copy a local file to the HDFS
      -copyToLocal : copy a file on the HDFS to the local disk

      -cp : copies one or more files
      -get : copies files to the local file system
      -put : copies files from the local file system
      -mv : moves one or more files

      Hadoop Namenode Commands:
      hadoop namenode -format: Format HDFS filesystem from Namenode
      hadoop namenode -upgrade: Upgrade the NameNode
      start-dfs.sh Start: HDFS Daemons
      stop-dfs.sh Stop: HDFS Daemons
      start-mapred.sh: Start: MapReduce Daemons
      stop-mapred.sh Stop: MapReduce Daemons
      hadoop namenode -recover -force: Recover namenode metadata after a cluster failure (may lose data) 


      Hadoop Configuration Files:
      core-site.xml : Parameters for entire Hadoop cluster
      hdfs-site.xml : Parameters for HDFS and its clients
      mapred-site.xml : Parameters for MapReduce and its clients

      yarn-site.xml : Parameters for nodemanager and resource manager
      masters : Host machines for secondary Namenode
      slaves : List of slave hosts

      hadoop-env.sh : Sets ENV variables for Hadoop 
      set JAVA_HOME=%JAVA_HOME%
      set HADOOP_PREFIX=D:\Hadoop


      Hadoop Job Commands
      hadoop job -submit : Submit the job
      hadoop job -status : Print job status completion percentage
      hadoop job -list all : List all jobs
      hadoop job -list-active-trackers : List all available TaskTrackers
      hadoop job -set-priority : Set priority for a job. Valid priorities : VERY_HIGH, HIGH, NORMAL, LOW, VERY_LOW
      hadoop job -kill-task : Kill a task
      hadoop job -history : Display job history including job details, failed and killed jobs


      Hadoop mradmin Commands
      hadoop mradmin -safemode get : Check Job tracker status
      hadoop mradmin -refreshQueues : Reload mapreduce configuration
      hadoop mradmin -refreshNodes : Reload active TaskTrackers
      hadoop mradmin -refreshServiceAcl : Force Jobtracker to reload service ACL
      hadoop mradmin -refreshUserToGroupsMappings : Force jobtracker to reload user group mappings


      Hadoop fsck Commands
      hadoop fsck / : Filesystem check on HDFS
      hadoop fsck / -files : Display files during check
      hadoop fsck / -files -blocks : Display files and blocks during check
      hadoop fsck / -files -blocks -locations : Display files, blocks and its location hadoop fsck / -files -blocks -locations -racks : Display network topology for data-node locations
      hadoop fsck -delete : Delete corrupted files
      hadoop fsck -move : Move corrupted files to /lost+found directory


      Hadoop Balancer Commands
      start-balancer.sh : Balance the cluster
      hadoop dfsadmin -setBalancerBandwidth : Adjust bandwidth used by the balancer
      hadoop balancer -threshold 20 : Limit balancing to only 20% resources in the cluster


      Hadoop Safe Mode (Maintenance Mode) Commands
      The following dfsadmin commands helps the cluster to enter or leave safe mode, which is also called as maintenance mode.
      In this mode, Namenode does not accept any changes to the name space, it does not replicate or delete blocks.
      hadoop dfsadmin -safemode enter : Enter safe mode
      hadoop dfsadmin -safemode leave : Leave safe mode
      hadoop dfsadmin -safemode get : Get the status of mode
      hadoop dfsadmin -safemode wait : Wait until HDFS finishes data block replication
      hadoop dfsadmin -report : total usage on the cluster


      Launching Hadoop Jobs:
      hadoop jar [mainClass] args... :
      Launch job via jar file
      hadoop jar com.twitter.scalding.Tool [mainClass] args : A Scalding job is launched using 
      mapred job -kill : If you need to kill a map-reduce job  

      Commonly Used Administration Commands:
      Format the namenode: hadoop namenode -format
      Starting Secondary namenode: hadoop secondrynamenode
      Run namenode : hadoop namenode
      Run data node: hadoop datanode
      Cluster Balancing: hadoop balancer
      Run MapReduce job tracker node: hadoop jobtracker
      Run MapReduce task tracker node: hadoop tasktracker


      Start/Stop Yarn (starts resourcemanager and nodemanager)and DFS (Starts namenode and data node) from sbin directory:
      start-yarn, stop-yarn
      start-dfs, stop-dfs


      Start and Stop ALL daemon from sbin directory:
      start-all, stop-all


      Check All 5 daemons (Namenode,Secoundary Node,Job Tracker, DataNode, Task Tracker ) are up using:
      jps

      Hadoop2x--Eclipse-plugin :
      Download => https://github.com/winghc/hadoop2x-eclipse-plugin/tree/master/release


      Monday, February 1, 2016

      UBUNTU


      Installing Java 8 on Ubuntu
      $ sudo add-apt-repository ppa:webupd8team/java
      $ sudo apt-get update
      $ sudo apt-get install oracle-java8-installer
      Verify Installed Java Version : 
      $ java -version
      Configuring Java Environment
      Install this package using following command.
      $ sudo apt-get install oracle-java8-set-default

      Install "Guest Additions" on Oracle VirtualBox
      - Select from the top menu: VirtualBox -> Devices -> Insert Guest Additions CD image
      - In Ubuntu open a terminal, navigate to cd folder (usually /media/VBOXADDITIONS*) and run
      $ sudo sh ./VBoxLinuxAdditions.run
      $ sudo usermod -a -G vboxsf darren
      (and replace ‘darren’ with your username)
      * NOTE:  the change will only be visible once you logout and login again!
      https://www.virtualbox.org/manual/ch04.html

      Expanding virtual harddisk to 20GB
      VBoxManage.exe modifyhd "C:\Users\jini\VirtualBox VMs\Ubuntu14\Ubuntu14.vdi" --resize 20480

      Set Environment Variable @ home directory
      gedit .bashrc (at home directory) or gedit /etc/profile
      export JAVA_HOME=/usr/lib/jvm/java-8-oracle
      export HADOOP_HOME=/usr/local/hadoop
      export HADOOP_PREFIX=/usr/local/hadoop
      export PATH=$PATH:$HOME/bin:$JAVA_HOME/bin:$HADOOP_HOME/bin
      export CLASSPATH=.:$JAVA_HOME/jre/lib:$JAVA_HOME/lib:$JAVA_HOME/lib/tools.jar


      SSH Configuration
      $ sudo apt-get install openssh-server
      $ ssh-keygen -t rsa -P ""
      $ cat $HOME/.ssh/id_rsa.pub >> $HOME/.ssh/authorized_keys
      $ Verify => ssh localhost /ssh -v localhost /sudo restart ssh


      Open CL Terminal =>> Use Ctrl+Alt+t
      Clear CL Screen => $ clear
      View Env variable => echo $JAVA_HOME
      Remove directory recursively as  administrator =>sudo rm -R [Directory name]
      List contents =>ls -al
      Copy file to current directory => $ sudo cp /media/sf_mywork/jdk-8u71-linux-i586.tar.gz .
      Untar commpressed file => $ sudo tar -zxf jdk-8u71-linux-i586.tar.gz
      Rename file => $ sudo mv jdk1.8.0_71 java 
      Change permission recursively => $ sudo chmod -R 777 /usr/local/hadoop